Wednesday, January 04, 2006

SHORTEN THE CHASSIS

Exercise extreme care when you shorten the belly pan. An inaccurate cut can throw the car out of alignment or result in a poor fit for the body. Be sure to check all measurements before and after you tack the pan together before welding solid.

1. With a metal scribe, mark a line in the belly pan that will extend from edge to edge and over the tunnel just behind the front seat tracks. To make certain the line is straight, form a piece of sheet metal over the tunnel to the back of the seat rails. When the line has been scribed, make certain the line is straight.

2. To scribe the second line, use a 14-3/4 inch long measuring stick with well-squared ends to ensure uniformity of distance. Place the stick on the first line and make several marks to the rear of the first across the belly pan. Scribe the second line and measure the distance from the first line in several places.

3. Make absolutely certain that the cut is straight and true; keep in mind that the alignment of the car will be directly affected by the cut.

4. See figure 1. When the pan is cut in two, the engine weight will force the rear portion of the belly pan upward and the forward portion will fall. Should this happen, the tunnel tubes would be badly damaged. To avoid this, place support blocks under the engine and a wheeled floor jack under the forward section.

5. Be extremely cautious when cutting through the tunnel section to avoid cutting the controls and control tubes.

6. The rear tunnel access hole must be enlarged. Place the access cover over the hole and align the cover screw holes with the tunnel screw holes. Scribe a line around the cover on the tunnel. Remove the access cover and scribe another line ½ inch inside the first line. Using the cutting torch, enlarge the access hole, cutting along the inside scribe line. The access cover will still completely cover the hole.

7. Start your cutting from the top side of the pan in the following order:
  • Cut through the top of the tunnel on the scribed lines approximately 1-½ inches in each direction from the center.

  • With a torch cut a line on the top center of the tunnel for the 14 ¾ inch length.
    Fold open the cut portion of tunnel. This will assist you in detaching the control guide tubes from the sides of the tunnel.

  • After tubes are detached from inside of tunnel the top of tunnel can now be cut away. Caution do not cut tubes. The pan may now be cut on scribed lines and this section removed.

8. The two tubes nearest the top are the emergency brake cable tubes and must be cut off with a hacksaw two inches behind the forward cut. These guide tubes may require re-welding to the forward brackets to give more working room.

9. Inside the rear access the control guide tubes (clutch, throttle, and on older models, the choke cable) will be found welded to the belly pan. Cut all the tubes loose where they emerge from the belly pan so that the rearward ends are completely free. Exercise caution: Do not cut the cables.

10. Grind or file the working edges to a surface suitable for welding.

11. Before moving the two halves of the belly pan together, align the clutch and throttle cable control guide tubes with the holes in the rear of the belly pan (where the tubes will emerge) to prevent hang up or crimping when the two halves are pulled together.

12. Clamp vice grips over the end of the gas line. Pull the gas line until the two halves of the belly pan are brought together.

SHORTEN GEARSHIFT SHAFT


See figure 2. From a point approximately two inches forward of the setscrew hole, scribe a line on the gear shift shaft tubing. Make this mark directly on centerline; forward at least 18 inches.


This line is critical, use a metal scribe so it will be legible.

Using the 14 ¾ inch measuring stick, used to mark the belly pan, mark 14 ¾ inches to be cut within the distance of the 18 inch scribed line.

Cut with a hacksaw so the cuts will be smooth and remove 14 ¾ inches.

Lay the gearshift shaft in a piece of angle iron with the scribe lines perfectly aligned and clamp the shaft to the angle iron. This will insure a straight joint when you weld the parts together.

WELDING THE PAN


It is necessary to make a few measurements before welding the two halves together to insure proper length, diagonal, and wheel track measurements. You may want to hold the two halves together with splints and c-clamps while you measure. Be sure the joint does not sag below the level line of the chassis. This will cause a poor fit of the body. If in doubt, weld joint should be raised instead of sag.

Wheel alignment is directly affected by the cut made in shortening the belly pan. Slight error may be corrected when the pan is welded. Alignment may be accomplished in the following manner (see figure 1-1):
  • Measure from points A to B, A to C.
  • Measure from points D to C, D to B.


All measurements should be within 1/16-inch tolerance.


After you tack the belly pan in three or four equally spaced places, you should measure over again the same as before.

After welding the joint in the belly pan you will notice the rear half is wider than the front half. When welding you should stop about 8” from the side rails to allow room to cut and trim as shown in figure 1-2.


When all the welding of the top side of the chassis is complete, turn the chassis up on it’s side and weld the bottom side of the belly pan. Make certain that the area of the tunnel has a good weld joint as this is the main support of the belly pan.

Monday, January 02, 2006

PREPARE THE CHASSIS

After the removal of the body, all the running gear is still attached to the floor pan; i.e. front axle and wheels, final drive, engine and rear wheels. These need not be removed.

1. With a putty knife remove all sound deadening material from the rear of the floor pan to just forward of the emergency brake lever and under the front seats.

2. Remove the main brake line from the “T” fitting at rear. Bend open tabs along the left side of the floor tunnel from the rear up to the vicinity of the emergency brake. Remove rubber grommet at the rear of the floor pan where the main brake line goes through to the “T” fitting. Extract the main brake line through the hole and gently bend the main brake line forward, out of the way, toward the pedals.

3. Remove the access cover at the forward end of the floor pan tunnel.

4. Remove the access cover at the rear end of the floor pan tunnel.

5. Remove the bolt from the front end of the coupling between the final drive and the gear lever linkage through rear access hole, leaving the coupling on the final drive.

6. Remove the 2 bolts at the gear lever. When removing the gear lever not position of the shift guide plate under the gear lever cover. The shift guide plate incorporates the reverse lockout, which is positioned on the right, or passenger side of the car and points up.

7. Place the gearshift in the neutral position before removing the gearshift shaft through the front end of tunnel.

8. Remove the emergency brake cables at brake lever. Remove snap ring at the pin on the emergency brake lever and remove the lever. Pull the emergency out of the tubes from the rear.

9. Remove the battery hold down and ground strap.

10. Remove the heater control wire and handle. On some models it will be necessary to saw off stub tube for installation of carpets.

11. Remove the rear of the body mounting rubber and fold forward. This will later be glued back down after shortening the floor pan.

Friday, December 30, 2005

ASSEMBLY OF THE COYOTE FIBERGLASS BODY


Your Coyote Body is in two parts, the main body section and the hood-dash.

THIS IS IMPORTANT AND WILL SAVE MUCH TIME. Do not place the body on the chassis at this point. Place the body on a pair of padded saw horses, for installation of wiring, instruments, etc.

Install all items possible before mounting the body to the chassis.

SELECTION OF CHASSIS

The chassis selected for the Terra-Buggy running gear should be that of the 1200-series or newer, Volkswagen sedan. the Volkswagen variant, truck, Bus, or Karmann Ghia chassis will not suffice. The instruments, wheels, transaxles, and engines from these autos may be used.

Removing the body is not a difficult task, however, note that the factory has used all metric bolt sixes. Special care should be taken not damage any part which could be sold for parts.

The parts you must save are as follows:

1. Seats and helper springs for adjustment.

2. Battery, strap and cover.

3. 1961 or later gas tank, saving the 4 rectangular washers.

4. Steering column, remove clamping bolt at bottom end of shaft. Save all the steering column assembly. Remove 2 blots and clamp at upper end of the column and save. When removing steering column clamp from the body, save the rubber grommet at the upper, and lower end, as these will be used later.

5. Remove wiring. As you do this tag all disconnected ends for future re-assembly. Color-coded wiring diagrams are shown in the VW Owner's Service Manual.

6. Remove and save: Speedometer, drive cable, ignition switch with bolts, light switch, 1958 or later windshield wiper, windshield wiper switch, gas gauge and sender cable; turning indicator lights, horn, tail lights, license plate light and fuse block. Not forgetting to include all rubber pads, washers and nuts. The larger 1961 or later tail lights are preferred.

7. Brake reservoir.

8. After all the above items have been removed and saved, the body is ready for removal frim the chassis. Bolts wil be found under the back seat, rear fenders, running boards and the gas tank. Save the rectangular washers from under the running boards.

9. Remove the and save the rubber mounting strip from the perimeter of the chassis.

Terra-Buggy

From here on out I'm going to refer to my Manx clone as a Terra-Buggy "Coyote." Most people call they're buggy the Sears Rascal, and I have yet to see someone refer to their buggy as Terra-Buggy Coyote.

I've located a bad copy of the assmebly instructions for the Coyote/Rascal, and since it's too cold out to get any real work done I've decided to post them on my blog. I figure that someone else may want to get a look at whats required to put a buggy together.

Thursday, December 29, 2005

Sears Ad


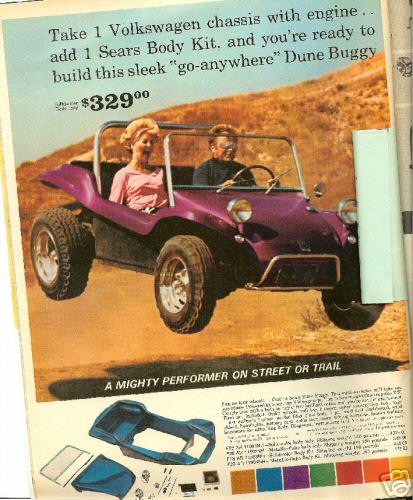
Here's an late 60's ad for the Sears Dune Buggy Body Kit. I always thought that the Sears kit had a rib running down the center of the hood. As you can see this one clearly doesn't. Maybe this kit was taken directly from a Meyer's Manx, then later changed to prevent legal issues?

Friday, November 04, 2005

Still Sanding


I still have losts of sanding to do, but it's getting there! The project will be put on hold until the spring. Too damn cold outside and not enough room in the garage.

Tuesday, September 27, 2005

Fiber-Jet


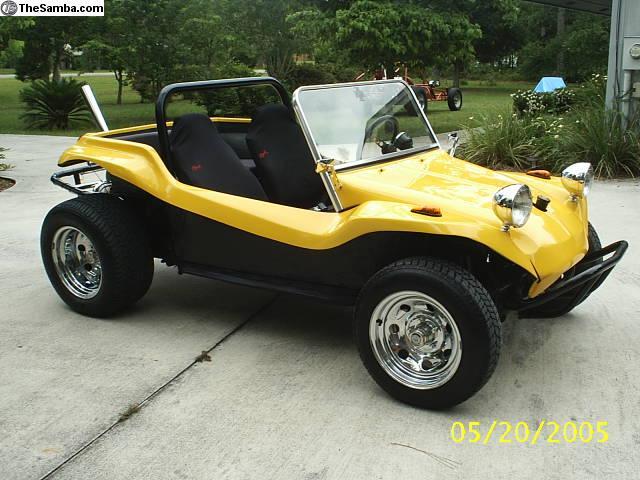
I saw this buggy on the Samba, and the seller called it a Fiber-Jet Manx Clone. Looks very close to a Rascal if you ask me. The windshield frame looks exactly like the one on my buggy.

Friday, August 05, 2005

Iron Cross Mirror


While surfing the Mooneyes website I found the Iron Cross, or Maltese Cross as some people call them rear view, and exterior Peep Mirrors.


Mooneyes wanted $39.95 for the rear view, and the same price for one Peep mirror, and I thought that I could do better on the price.


While browsing through my local Pep Boys auto, I found out that APC has a version that looks exactly like the Mooneyes one for $33.00.


The price was slightly better but I thought that I could still do better. Once again eBay to the rescue! After watching a few auctions I ran across one with a low start price that only had one bid. I placed my bid at the last possible second and was able to score the APC mirror for $16.75 shipped to my door!

The Iron Cross Peep mirrors have been around $28.99 a pair on eBay. I'm still looking to get them a little cheaper. I missed one auction for a set that sold for $16.99, maybe I'll get lucky and get a deal like that later on down the road!

Thursday, August 04, 2005

Let There Be Light!


These are the lights that I purchased on eBay. They are 5" in diameter, have a diamond cut lense, and a built in running light that I'm going to use as a turn signal. The bulbs are Hyper Whites and have a blueish tint to them when off. The current parking light bulbs that are installed in the lights are blue and will be changed out to amber ones to keep everything legal.

Wednesday, August 03, 2005

Flip Top Gas Cap


I wanted a flip top gas cap and tried to find something that wasn't too expensive. I went to the local boating place and they wanted $40.00 for a marine gas cap. I thought that was a little too much to pay. Bugpack has a flip top cap that sells for around $30.00 and I seriously considered purchasing it, however I thought that I could do better on the price.

My search led me to eBay and I spent a few weeks trying to find something for a song. After looking at the Mooneyes, and Triumph caps going for over $50.00 a pop I all but gave up. I amended my search parameters and low and behold I found several Jaguar caps going for cheap. The cap that I purchased is from a Jaguar XJ6 and I paid a whopping $9.00 for it!

Sears Rascal


Nice Rascal that was recently for sale on the Samba.

This is another shot of the Rascal that was for sale on the Samba.

Thursday, June 23, 2005

Terra Buggy


Sears was the distributor for Terra Buggy Sales in Crawfordsville Indiana. Terra Buggy called it the Coyote, and Sears called it the Rascal. I noticed a faded square sticker on the front bulkhead underneath the gas tank so I'm guessing mine may be a Terra Buggy, even though it doesn't have the distinct dash with the extension. Mine has a Manx type ABS dash, and I also noticed that the hardtop on mine looks more like the Manx hardtop.

Posted by Hello

Sears Rascal


I've been doing a little research and I think that my buggy is either a Sears Rascal or Terra Buggy. I found these photos and the web. Posted by Hello

Tuesday, June 21, 2005

Can't Seem To Finish One Project!

Well, I've always wanted a dune buggy, and figured that one day I'd purchase one after getting the 56 on the road. I started parting out the Karmann Ghia last year and sold off a fair bit of stuff and was left with the shell, and pan which I still hold the title for.

I had a couple of ads going on The Samba and a local gentleman contacted me about some wheels I had. He was into buggies and sand rails, and was trying to hook his friend up with some Pacer Wheels to finish his Berrien Buggy off. I seem to be the Pacer warehouse for the south burbs! Well all I can say is that these guys gave me the nudge I needed to get a buggy sooner than later.

I watched the buggy forums and eBay to see if there was something in my price range in the area. I didn't want to spend a lot of money, becasue I'd have to explain to the wife why I was dragging home another project, and haven't completed the two taking up space in the garage now. About a month ago I saw an auction for a Manx clone on eBay that was local, and figured that I'd put my bid on it, and as expected I was outbid. I noticed that the winning bidder had zero feedback and lived in California. Since this auction was for local pickup only I emailed the seller and informed him if the deal went south to give me a call and I'd buy the shell. Needless to say the deal was bad from the begining, and about a month later I was the owner of a new to me Manx clone.